
Installation
a VPS, step by step.
Install Vodmill on Ubuntu with Node.js, put https in front of it with Caddy or nginx, and run it as a systemd service. Docker is described at the end as an alternative.
The commands on this page are for the shell of a Linux server (bash). You type them after connecting with ssh root@your-server from the terminal of your own computer. On Windows use PowerShell's built-in ssh, or WSL.
01How it fits together
Vodmill is one Node.js process. It listens on port 8787 by default and keeps everything it stores in one folder, DATA_DIR (data inside the product folder unless you change it): two SQLite databases and the files of every workspace. ffmpeg runs on the same machine. Caddy or nginx in front serves https on your domain.
| Piece | Where |
|---|---|
| Product folder | /opt/vodmill in this guide |
| Settings file | /opt/vodmill/.env, read by the server itself on start |
| Data | /opt/vodmill/data: app.sqlite, admin.sqlite, files/ |
| Port | 8787, reached only through the https proxy |
021. Install Node.js 22 and ffmpeg
curl -fsSL https://deb.nodesource.com/setup_22.x | sudo -E bash -
sudo apt install -y nodejs ffmpeg python3 make g++ unzip
node --version
ffmpeg -version | head -n 1
ffprobe -version | head -n 1
node --version must print v22.12 or newer. ffprobe comes with the ffmpeg package. The build tools (python3 make g++) are only used when no prebuilt database driver fits your system.
032. Unpack Vodmill
Copy the ZIP to the server (for example with scp from your computer) and unpack the source folder into /opt/vodmill:
sudo mkdir -p /opt/vodmill
sudo unzip vodmill.zip -d /opt/vodmill
ls /opt/vodmill               # package.json must be listed here
If package.json is one folder deeper, move the contents of that folder up into /opt/vodmill.
043. Create the settings file
cd /opt/vodmill
cp .env.example .env
openssl rand -hex 32
nano .env
Set three values and save (Ctrl+O, Enter, Ctrl+X):
PUBLIC_URL: the https address people will use, for examplehttps://clips.your-agency.com.ADMIN_SECRET_KEY: the 64 characters thatopenssl rand -hex 32printed. It seals the API keys you save in the console. Keep a copy somewhere safe: without it the saved keys cannot be read after a restore.TRUST_PROXY_HOPS=1, because Caddy or nginx will sit in front.
Every variable is explained in Configuration. Everything else is set later in the console.
054. Install, build, start
cd /opt/vodmill
npm install
npm run build
npm start
npm install installs the packages listed in package-lock.json. npm run build compiles the server into dist/ and the app into web/dist/. npm start runs node dist/src/server/index.js. The log then shows:
[admin] No owner account yet. Open /admin and create it with this one-time setup code:

    XXXX-XXXX-XXXX-XXXX

[vodmill] 1.0.0 on http://localhost:8787  app: /app  console: /admin
In a second SSH window check that it answers:
curl http://127.0.0.1:8787/healthzThe answer is {"ok":true,"version":"1.0.0"}. Stop the server with Ctrl+C; the next steps run it properly.
065. Run it as a service (systemd)
A process manager starts Vodmill on boot and restarts it if it stops. On Ubuntu that is systemd. Create a user for it and hand it the folder:
sudo useradd --system --home /opt/vodmill vodmill
sudo chown -R vodmill:vodmill /opt/vodmill
sudo nano /etc/systemd/system/vodmill.service
Paste this and save:
[Unit]
Description=Vodmill
After=network.target

[Service]
WorkingDirectory=/opt/vodmill
ExecStart=/usr/bin/node dist/src/server/index.js
Restart=always
User=vodmill
Environment=NODE_ENV=production

[Install]
WantedBy=multi-user.target
sudo systemctl daemon-reload
sudo systemctl enable --now vodmill
sudo systemctl status vodmill
journalctl -u vodmill -n 50 # the log, with the setup codeThe server reads .env from its own folder by itself (src/server/index.ts), so the unit file needs no EnvironmentFile. Later: sudo systemctl restart vodmill after you change .env, and journalctl -u vodmill -f to follow the log.
076. https with a reverse proxy
Point your domain's DNS A record at the server first. Then choose one.
Caddy (gets the certificate by itself)
sudo apt install -y caddy
sudo nano /etc/caddy/Caddyfile
clips.your-agency.com {
reverse_proxy 127.0.0.1:8787
}sudo systemctl reload caddynginx with Certbot
sudo apt install -y nginx certbot python3-certbot-nginx
sudo nano /etc/nginx/sites-available/vodmill
server {
listen 80;
server_name clips.your-agency.com;
client_max_body_size 64m;
location / {
proxy_pass http://127.0.0.1:8787;
proxy_set_header Host $host;
proxy_set_header X-Forwarded-For $proxy_add_x_forwarded_for;
proxy_set_header X-Forwarded-Proto $scheme;
proxy_request_buffering off;
proxy_read_timeout 300s;
}
}sudo ln -s /etc/nginx/sites-available/vodmill /etc/nginx/sites-enabled/vodmill
sudo nginx -t
sudo systemctl reload nginx
sudo certbot --nginx -d clips.your-agency.comVideos are uploaded in pieces of 8 MB (CHUNK_BYTES in src/server/routes/sources.ts), and a music track in the console may be up to 30 MB. nginx refuses bodies over 1 MB unless client_max_body_size is raised; Caddy has no limit by default.
Keep TRUST_PROXY_HOPS=1 in .env so sign-in rate limits see the visitor's address, not the proxy's. Block direct access to the port with the firewall:
sudo ufw allow OpenSSH
sudo ufw allow 80,443/tcp
sudo ufw enable087. Check the installation
curl https://clips.your-agency.com/healthzanswers{"ok":true,"version":"1.0.0"}.https://clips.your-agency.com/adminopens the console and asks for the setup code.- After you sign in, the console's System health page shows ffmpeg and ffprobe as found, free disk in
DATA_DIRand the keys that are still missing.
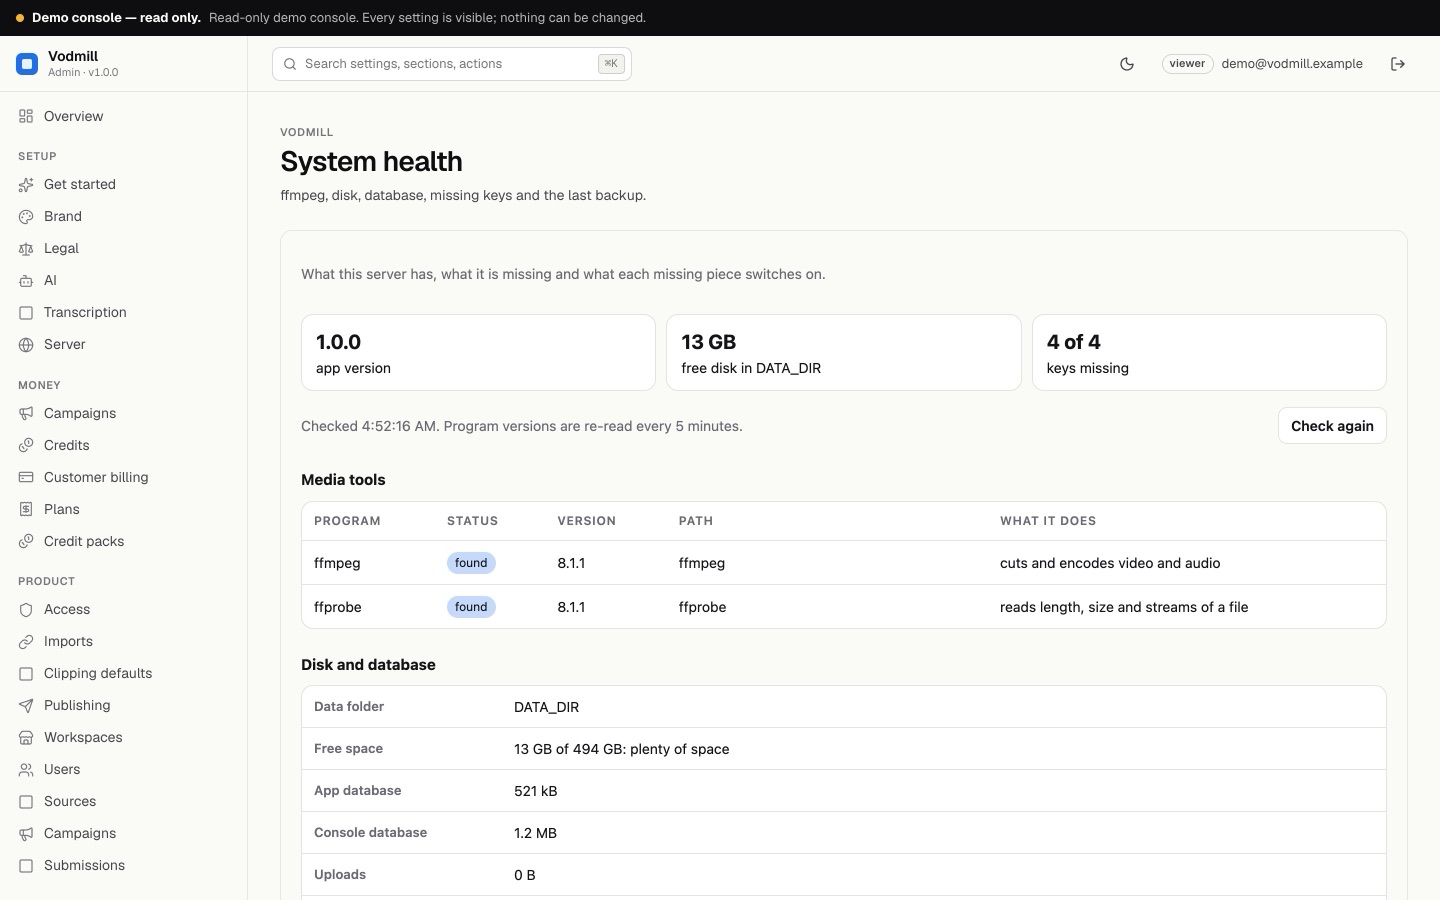
Continue with First steps: the console owner, the secret key and your first app account.
09Alternative: Docker
The package has a Dockerfile. It builds in two stages and runs plain node on node:22-bookworm-slim with Debian's ffmpeg, as the unprivileged node user, with DATA_DIR=/app/data.
cd /opt/vodmill
cp .env.example .env
nano .env                     # PUBLIC_URL, ADMIN_SECRET_KEY, TRUST_PROXY_HOPS=1
docker build -t vodmill .
docker volume create vodmill-data
docker run -d --name vodmill --restart unless-stopped \
  -p 127.0.0.1:8787:8787 --env-file .env \
  -v vodmill-data:/app/data \
  vodmill
docker logs vodmill           # the one-time setup code for /admin is here
-p 127.0.0.1:8787:8787makes the server reachable only from the machine itself, so visitors always go through the https proxy.- The image contains the app, the web interface, the console, the face detection model (
models/) and the backup scripts (Dockerfile). Everything that changes is in thevodmill-datavolume. - Commands inside the container run with
docker exec, for exampledocker exec vodmill npm run backup. - The image contains neither whisper.cpp nor yt-dlp. If you want local transcription, or imports from YouTube, Twitch or Kick links, with Docker, mount them into the container (and the whisper model) and enter the paths as the container sees them in the console.
For this guide the build, start, health check, account, backup, restore and upgrade-check commands were run on version 1.0.0 with plain Node.js. The Docker, systemd, Caddy and nginx commands follow the files in the package and the usual Ubuntu setup but were not run for this release; if a Docker step fails, use the Node.js path above.